Friday, November 25, 2011

Historic update

Sorry people, life got in the way of the blog. I'm probably gonna rush through this first Millennium Falcon construction because since we last spoke I have started ordering parts for a second Millennium Falcon.
This second one will be a stealth version, all black with dark blue and dark red parts as well.
I've already ordered about 85% of the parts I need for this version and plan on starting construction soon.  I will post much more pictures and trick and tips when I start that one as it is much easier to blog the information as I go instead of trying to think back as to how I did everything.
I also plan on changing some of the stuff on this new version. The original had lots of cool "greebils" on it, but with this new one I've ordered lots of hoses and plan to make it look a little "messier" like the real Falcon. Yes, I plan on making a few special modifications.


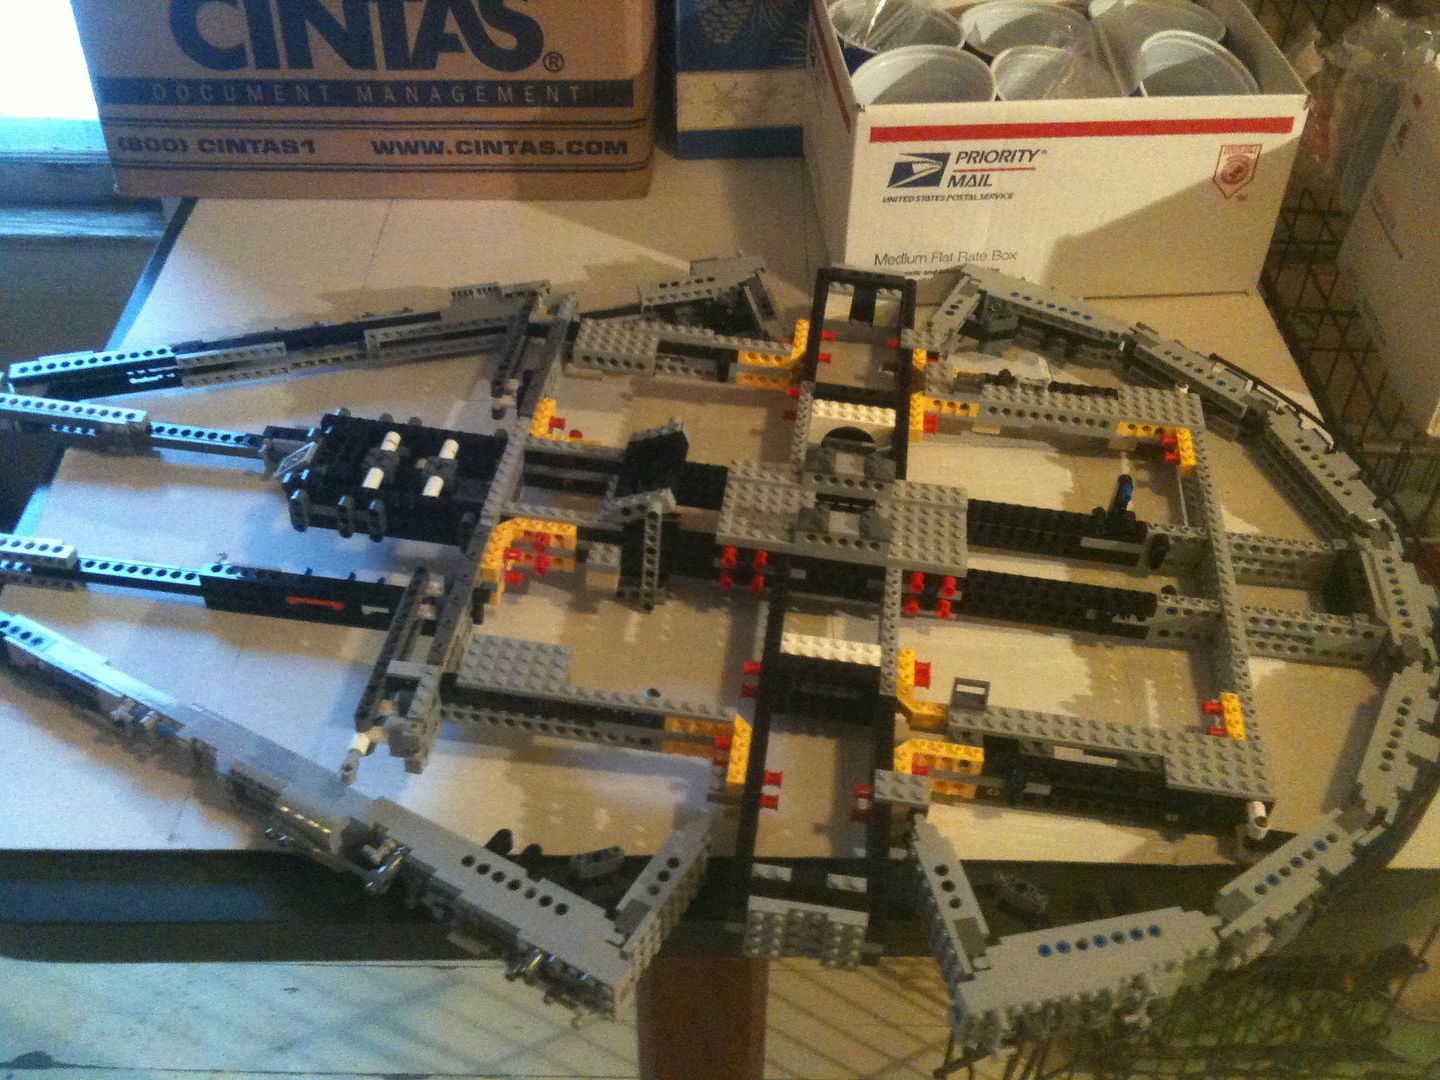
Okay, so when we last left the original Falcon, it was just a basic framework. I was quite impressed with the framework as it is required to hold together some 30+ pounds of Lego. It is reinforced and cross-reinforced in many ways and quite impressive when you actually hold the framework and look at all the little Lego tricks they used to make it so structurally sound.

Just so you understand my definitions, I consider "framework" anything that is just there to provide shape and support for other parts. "hull work" is anything that is just a layer resting on the framework. In some cases the actual framework and hull work is combined in a hybrid because the decorative outside piece is also providing support (we'll see more of this later).

Basic framework. Notice all the reinforcements by way of the yellow technic corner pieces.

Even closer onto the framework

Secondary framework being added

secondary framework and some outside detail
In the pictures above you can see the genius that went into the design. The basic frame is two identical levels of Technic bricks with plates between them. There are then Technic bricks that run vertically between the horizontal layers to lock the two layers together. Also, though much harder to see are spacers that run horizontal with pins that hold the layers together as well. You can see how everything that attaches to the main framework also attaches at multiple points to make the larger frame even more sturdy.

The aft engine section, which is a strip of side-by-side sandwiched Technic bricks joined with hinge bricks attaches in almost ten places along the framework to strengthen it even more. In this instance the detail work is built as part of the secondary framework.


Tuesday, June 7, 2011

More work on Falcon, and starting the Gleego project.

Work on the Falcon continued in spurts. I was about a month in to the project and still only had about 80% of the total parts. Sometimes I would skip over a step and build other sections ahead of schedule, waiting to apply them later. One of the biggest hangups was not having four small parts that held the two front "wing" frames on. In some of the pictures I just placed the wings in the area they would later be attached. Luckily, large parts of the Falcon were sections of paneling, so I was able to work on those and attach them or put them aside for later.

Around this time I also started experimenting with another idea: Gleego. Recreating scenes from Glee with Lego. As you can see, the beginning was kinda rough.

But after some experimenting and investing in more parts, things got better.

Monday, June 6, 2011

Construction Continues

This thing was big, really big! The internal framework at this point was bigger than the freezer I used to take pictures of it on.
Framework with one of the wing sections attached early - just to see what it would look like. 
Rear engine framework attached now.

Building the Millennium Falcon

I am a Lego junkie.  It's not my fault. My parents gave me the first taste of the sweet plastic bliss when I was just a child. My parents were evil, they allowed my sisters to taste the sweet colorful drug too. With their help, my sisters and I amassed a large box of the dangerous little bricks.
I got away from the Lego for a while, Life and such got in the way. Then in early 2010 I saw the most amazing thing. Those Lego people knew how to push their stuff. It was a Lego Millennium Falcon. At the time it was the largest Lego set ever produced, 5,195 pieces and 33 inches long. I wanted it, and I would do anything to get it. For the rest of the year I schemed at how to come up with the $500 to buy it.
Around November I had just paid off another credit card and was itching to charge something cool. I went online to check the price and discovered to my horror that the set had been discontinued and the price had jumped to over $1,000. My soul was shattered. I was in ruins.
After a few weeks of non stop depression and hours a day of adult crying, I stumbled onto a website called Bricklink. It was a site where one could buy and sell individual Lego bricks. That's where I got my insane idea. Instead of buying the whole set, I would build my Falcon from parts.
I searched the internet hoping to find a poorly scanned pdr of the instructions, and found something even better. There were PDFs of instructions for every lego product even made on lego.com
I dug out a box of Lego that I had bought on Ebay a year earlier. It was a mix of all kinds of parts. I also pulled out a couple hundred bricks I would need for my Falcon, then figured out how to list them for sale on Bricklink and quickly got a couple of small orders. As money started coming in from my Bricklink sales, and a sudden burst of overtime at work, I started placing parts orders. The envelopes began to arrive in the mail.

And shortly afterwards, construction began.